
Or Greater and Want to Customize it Then You landed on a Right place. Lets Discuss Something Cool.
How do you spruce up the Windows 8 Start screen? you want to customize security login? etc
Whether you’re a Windows 8 maven or you're still getting your feet wet, you’ve probably bumped into a host of screens, commands, and other features that you’d like to control or adjust. And those of you who checked out Windows 8.1 via the Preview edition, got it preinstalled on a new PC late in 2013, or received it via a Windows update in mid-October or later may feel the same way.
Tip 1: How to Pin Apps and Folders to the Start Screen
Works with: Windows 8 and Windows 8.1
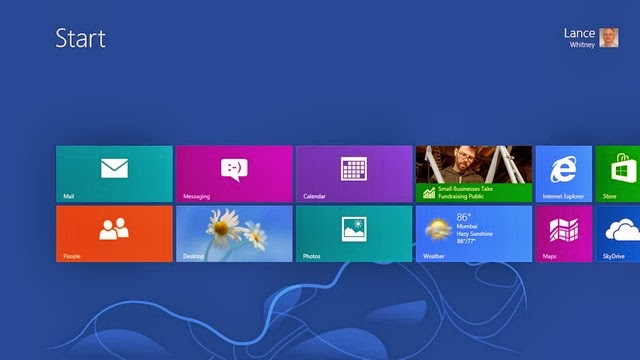
As the launching pad in Windows 8 and 8.1,
Whether you’re a Windows 8 maven or you're still getting your feet wet, you’ve probably bumped into a host of screens, commands, and other features that you’d like to control or adjust. And those of you who checked out Windows 8.1 via the Preview edition, got it preinstalled on a new PC late in 2013, or received it via a Windows update in mid-October or later may feel the same way.
Tip 1: How to Pin Apps and Folders to the Start Screen
Works with: Windows 8 and Windows 8.1
As the launching pad in Windows 8 and 8.1,
the Start screen can be set up with tiles that show your favorite apps and folders. This was less urgent in Windows 8, because all installed Windows apps and desktop programs automatically appeared on the Start screen.
Apps installed in Windows 8.1, however, simply get a spot in the Apps screen; it’s up to you to decide which ones you want to add to the actual Start screen.
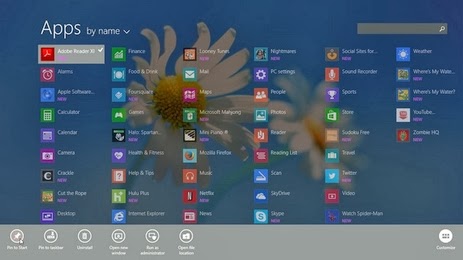
In Windows 8.1, your first step should certainly be to pin apps from the Apps screen.
In Windows 8.1, your first step should certainly be to pin apps from the Apps screen.
To do this, open the Apps screen. (In Windows 8, right-click on the Start screen and then click on the Apps button; in Windows 8.1, click on the down arrow in the lower left-hand corner.)
Then, just right-click on the app you wish to have appear on the Start screen and click on the Pin to Start button in the apps bar.
You can also add shortcuts and folders from the desktop to populate your Start screen. To pin a shortcut from the desktop, open the desktop. Right-click on a shortcut from the desktop or the Taskbar, and select Pin to Start from the popup menu. To pin a specific folder, such as Documents or Pictures, open File Explorer. Browse to and right-click on the folder you wish to pin and click on Pin to Start from the popup menu. After you’ve pinned an item, hop back to the Start screen, scroll all the way to the right, and your new tiles should appear.
You can also add shortcuts and folders from the desktop to populate your Start screen. To pin a shortcut from the desktop, open the desktop. Right-click on a shortcut from the desktop or the Taskbar, and select Pin to Start from the popup menu. To pin a specific folder, such as Documents or Pictures, open File Explorer. Browse to and right-click on the folder you wish to pin and click on Pin to Start from the popup menu. After you’ve pinned an item, hop back to the Start screen, scroll all the way to the right, and your new tiles should appear.
Booting into Windows 8 can be time-consuming. First, the lock screen pops up to show you various notifications. Then, the login screen takes center stage to ask you for your password. You may want that type of security in a crowded office to protect your PC from prying eyes. But if you’d rather sail straight to the Start screen, you can get rid of both the Lock screen and the login screen in one fell swoop. Here’s how.

Open the Start screen and type netplwiz. The command for netplwiz, a.k.a. the User Accounts Control Panel, appears in the search results. Click that command. In the User Accounts Control Panel, select the account you wish to use to log in automatically. Click off the checkbox above the account that says "Users must enter a user name and password to use this computer." Click OK. Enter your password once, and then a second time to confirm it. Click OK, and restart Windows. Windows bypasses the lock screen and login screen to deposit you directly at the Start screen.
To re-enable both screens, simply return to the User Accounts Control Panel using the steps above and click on the checkbox for the "Users must enter a user name and password to use this computer" option.
Tip 3: How to Change the Number of Start Screen Rows
Works with: Windows 8
The Start screen displays a certain number of rows for your tiles, anywhere from one to six, based on your screen resolution. The higher the resolution, the more rows you see. But you can force a specific number of rows to appear via a simple Registry tweak.
To enable this, open the Registry Editor by typing regedit at the Start screen and selecting its tile from the search results. Move to the following key: HKEY_CURRENT_USER\Software\Microsoft\Windows\CurrentVersion\ImmersiveShell\Grid. Select the Grid key. Click on Edit, then New, then "DWORD (32-bit) Value." Name the value Layout_MaximumRowCount. Double-click on the Layout_MaximumRowCount value and change the value data to the number of rows you want to appear, any number from 1 through 6. Reboot your PC, and when you land back at the Start screen, you should see only the number of rows you chose.
Note that your Start screen will still display only the maximum number of rows allowed by your resolution. So, you won’t see six rows if your monitor is only capable of displaying three. Alas, this tweak doesn’t seem to do the trick in Windows 8.1.
